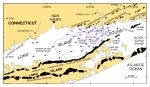
 | Figure 1. Map showing location of study area around Six Mile Reef (open red polygons). Also shown are major onshore moraines (solid black polygons), generalized net bottom sediment transport directions (blue arrows; Signell and others, 2000), and extent of the marine delta produced by the draining of glacial Lake Hitchcock (dashed green line; Lewis and Digiacomo-Cohen, 2000). |
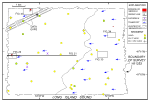
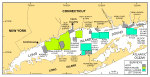 | Figure 2. Map showing location of the bathymetric and backscatter surveys completed in Long Island Sound. Multibeam surveys by the NOAA ship Thomas Jefferson are shown in dark green. The sidescan-sonar and bathymetric surveys completed by the NOAA ship Rude are shown in light green (Poppe and others, 2006a): H11043--Poppe and others (2004); H11044--McMullen and others (2005); and H11045--Beaulieu and others (2005). Also shown are the sites of USGS sidescan-sonar surveys in gray: Norwalk--Twichell and others (1997); Milford--Twichell and others (1998); New Haven Harbor and New Haven Dumping Grounds--Poppe and others (2001); Roanoke Point--Poppe and others (1999a); Falkner Island--Poppe and others (1999b); Hammonasset--Poppe and others (1997); Niantic Bay--Poppe and others (1998a); New London--Zajac and others (2000, 2003); Fishers Island Sound--Poppe and others (1998b).
|
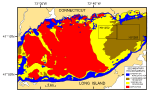 | Figure 3. Map from Knebel and Poppe (2000) showing the distribution of sedimentary environments in east-central Long Island Sound. Map also shows the locations of NOAA surveys H11043 and H11255. Note that environments characterized by coarse bedload transport dominate within survey H11361 and energy of the environment decreases westward in the vicinity of the surveys. |
 | Figure 4. Map from Poppe and others (2000) showing the distribution of surficial sediments in east-central Long Island Sound. Map also shows the locations of NOAA surveys H11361 and H11252. Note that sediments generally fine westward in the vicinity of the surveys.
|
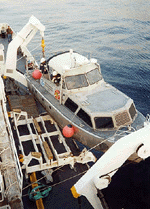
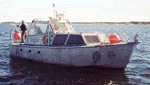
 | Figure 5. Port-side view of the NOAA Ship Thomas Jefferson at sea. Note that the 30-foot survey launch normally stowed on this side of the ship has been deployed. |
 | Figure 6. Image showing NOAA Launch 1014 being deployed from the NOAA Ship Thomas Jefferson. |
 | Figure 7. Image showing a starboard-side view of NOAA Launch 1014 afloat. |
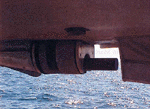
 | Figure 8. Image showing the Reason 8125 multibeam transducer mounted to the hull of the NOAA Launch 1014. |
 | Figure 9. Image showing the Reason Seabat 8101 hull mounted in the keel cut out of NOAA Launch 1005. |
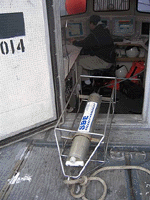 | Figure 10. CTD (conductivity-temperature-depth) profiler shown on the deck of the NOAA Ship Thomas Jefferson. Data derived from frequent deployments of this device were used to perform sound velocity corrections on the multibeam data. |
 | Figure 11. Correlation chart showing the relationships between phi sizes, millimeter diameters, size classifications (Wentworth, 1922), and ASTM and Tyler sieve sizes. Chart also shows the corresponding intermediate diameters, grains per milligram, settling velocities, and threshold velocities for traction. |
 | Figure 12. Sediment classification scheme from Shepard (1954), as modified by Schlee (1973).
|
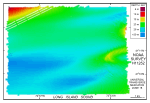
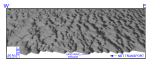
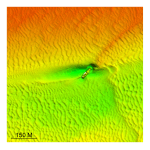
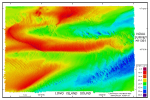 | Figure 13. Digital terrain model of the sea floor from NOAA survey H11361 around Six Mile Reef. Image is sun-illuminated from the north-northeast and vertically exaggerated 8X. See key for depth ranges. |
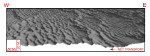
 | Figure 14. Digital terrain model of the sea floor from NOAA survey H11252 west of Six Mile Reef. Image is sun-illuminated from the north-northeast and vertically exaggerated 8X. See key for depth ranges. |
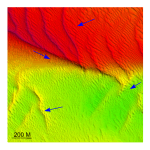
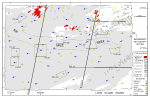 | Figure 15. Geological interpretation of the bathymetry from survey H11361 in the eastern part of the study area around Six Mile Reef. Arrows show directions of net sediment transport based on sand-wave and scour-mark asymmetry. Also shown are locations of the seismic profiles shown in figures 17, 18, 19, and 24, and detailed multibeam views of the sea floor shown in figures 20, 25, 26, 27, 28, 29, 31, 32, 33, and 35. See insets for explanation of symbols. |
 | Figure 16. Geological interpretation of the sea-floor bathymetry from survey H11252 west of Six Mile Reef. Arrows show directions of net sediment transport based on sand-wave and scour-mark asymmetry. Also shown are locations of Chirp seismic profile shown in figure 21, and detailed multibeam views of the sea floor shown in figures 22, 23, 30, and 34. See inset for explanation of symbols. v |
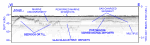
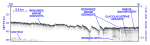
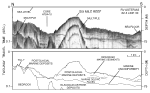 | Figure 17. Uniboom seismic-reflection profile across the eastern part of Six Mile Reef (RV Asterias 82-3; line 30). Profile shows that glaciolacustrine deposits are exposed to the north. Note location of core AT84-10 (Poppe and others, 2002b). Location of seismic profile and core location are shown in figure 15. |
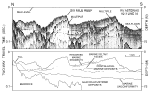 | Figure 18. Uniboom seismic-reflection profile across the western part of Six Mile Reef (RV Asterias 82-3; line 34). Profile shows that postglacial marine deposits, composed of deltaic facies and reworked sediments, thicken westward. Interpretation of profile modified from Lewis and Needell (1987). Location of seismic profile is shown in figure 15. |
 | Figure 19. CHIRP high-resolution seismic-reflection profile from the eastern part of survey H11361 showing exposed till and (or) bedrock surface northeast of Six Mile Reef. Note layered seismic character of the glaciolacustrine deposits and sand wave asymmetry suggesting westward transport. Location of seismic profile is shown in figure 15. |
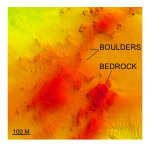 | Figure 20. Detailed planar view of multibeam bathymetry from survey H11361 showing exposed bedrock and till. Boulder fields reveal offshore extension of the Old Saybrook moraine north of Six Mile Reef. Location of detailed view is shown in figure 15. |
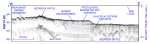
 | Figure 21. CHIRP high-resolution seismic-reflection profile from the western part of survey H11252 showing irregular character of till and (or) bedrock surface west of Six Mile Reef. Note thin nature of the modern sediments, smooth nature of the sea floor, location of marine unconformity, and postglacial marine deltaic deposits that dip slightly westward. Location of seismic profile is shown in figure 16. |
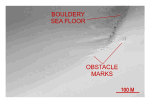
 | Figure 22. Detailed planar view of multibeam bathymetry from survey H11252 showing outcrops of bedrock and till along western edge of this survey area. Note asymmetrical obstacle marks indicating westward transport. Location of detailed view is shown in figure 16. |
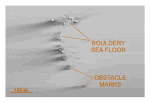
 | Figure 23. Detailed planar view of multibeam bathymetry from survey H11252 showing the bouldery sea floor along northern edge of this survey area, probably an exposed segment of the offshore extension of the Hammonasset-Ledyard moraine. Note asymmetrical obstacle marks indicating westward transport. Location of detailed view is shown in figure 16. |
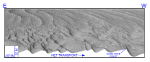
 | Figure 24. CHIRP high-resolution seismic-reflection profile from survey H11361 showing large transverse sand waves southeast of Six Mile Reef. Bedform asymmetry indicates net sediment transport is toward the west. Note that the deeper troughs extend into underlying postglacial marine deltaic deposits suggesting that erosion is ongoing. Location of seismic profile is shown in figure 15. |
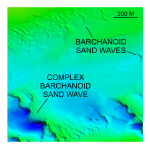 | Figure 25. Detailed planar view of multibeam bathymetry from survey H11361 showing barchanoid sand waves northeast of the shoal suggesting net transport to the west. Location of detailed view is shown in figure 15. |
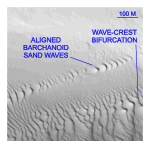 | Figure 26. Detailed planar view of multibeam bathymetry from survey H11361 showing asymmetrical transverse and barchanoid sand waves suggesting net westward transport. Note sharp contacts between sand waves and surrounding flat sea floor and bifurcation of transverse wave crests near the edge of that field. Location of detailed view is shown in figure 15. |
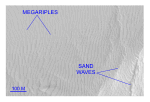
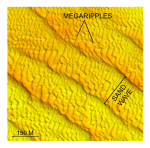 | Figure 27. Detailed planar view of multibeam bathymetry from survey H11361 showing megaripples superimposed on transverse sand waves southwest of shoal. Wave symmetry suggests net southwesterly transport; megaripples on sand waves reveal a westerly transport component and suggest that transport is active. Location of detailed view is shown in figure 15.
|
 | Figure 28. Perspective view of sand waves in the vicinity of Six Mile Reef. View shows slightly sinuous transverse sand waves south of western part of the shoal and that transport is to the west. Location of perspective view is shown in figure 15; scale is valid only in foreground.
|
 | Figure 29. Perspective view of sand waves in the vicinity of Six Mile Reef. View shows transverse sand waves south of eastern part of shoal and that transport is to the west. Location of perspective view is shown in figure 15; scale is valid only in foreground.
|
 | Figure 30. Detailed planar view of multibeam bathymetry from survey H11252 showing that sand-wave and megaripple amplitude decreases markedly westward of Six Mile Reef. Trough-to-crest sand-wave amplitude exceeds 4.7 m in eastern part of the image, but sand waves are absent and megaripple amplitudes average only about 0.25 m along western edge. Location of detailed view is shown in figure 16.
|
 | Figure 31. Detailed planar view of multibeam bathymetry from survey H11361 showing net transport directions near the western end of the shoal. Easterly counter currents help shape and maintain the shoal and effect its westerly migration. Location of detailed view is shown in figure 16.
|
 | Figure 32. Perspective view showing transverse sand waves over eastern part of shoal. Note waves become more symmetrical and smaller on top of the shoal, wave crests there are convex westward, and large complex barchanoid waves are in foreground. Location of detailed view is shown in figure 15; scale is valid only in foreground.
|
 | Figure 33. Perspective view of sand waves north of western part of shoal. Arrow shows interpreted net transport direction. Brackets show lateral and vertical scale, but are only accurate in the foreground. Location of perspective view is shown in figure 15; scale is valid only in foreground.
|
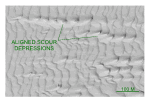 | Figure 34. Detailed planar view of multibeam bathymetry from survey H11252 showing the aligned isolated depressions that form in troughs of adjacent sand waves. Locations of detailed view is shown in figure 16.
|
 | Figure 35. Detailed planar view of multibeam bathymetry from survey H11361 showing the intense scour around wreck of the Lake Hemlock, a converted WW1 cargo ship that sank in 1957, indicating net westward sediment transport. Location of detailed view is shown in figure 15.
|


